A24 RMP
Reducing the impacts of invasive small mammals is an important component of natural resource conservation throughout Hawaiʻi. This Recommended Best Practices (RMP) from the Hawaiʻi Conservation Alliance is for the use of A24 automatic resetting traps manufactured by Goodnature (GoodNature.co.nz) and sold in the USA by Automatic Trap Company (https://www.automatictrap.com/). We provide a brief overview of rodent control and a "Quick Start Guide" for the use of A24s, cover safety and regulations, purchasing, procedures for planning and implementation, procedures for trap checking and data management. We provide additional recommendations and tips from predator control practitioners in Hawaiʻi. This document will track current next steps and future research needs. We will incorporate new information as it is developed and highlight challenges and needs as the practice of controlling rodents with A24s in Hawaiʻi continues to evolve. For more information, see the resources section.
Use the side-menu to jump between sections. Download this complete resource as a word doc at any point. The appendices are also provided as pdf downloads.
Background
In Hawaiʻi, A24 traps are used to humanely dispatch rats (Rattus rattus, R. norvegicus, R. exulans) to reduce predation of native plants and animals. Observations of A24 non-target species (mice and mongoose) kills are not unheard of. GoodNature manufactures a mouse shroud to adapt the A24 trap for controlling mice; however, its efficacy and humane targeting of mice in Hawaiʻi have not been evaluated. For mongoose, the A24 may decrease in humaneness as the full pressure of the trap decreases. The GoodNature A18 model has been rated for mongoose control. This RMP focuses on the application of A24 for rats, based on recommendations from the New Zealand Department of Conservation and the professional experience of programs within the Hawaiʻi Conservation Alliance (HCA) and the broader Hawaiʻi Conservation community.
Quick Start Guide
-
Determine how many traps you can afford, maintain, and fit into your site
-
Traps should be deployed in a 100-meter by 50-meter grid. Larger grids with more traps will reduce the frequency and intensity of impacts to protected resources. Ultimately, grid design will vary depending on site-specific rat densities and management goals. See Appendix 4 for more information and examples of grid design.
-
Traps should not be attached to ʻōhiʻa trees to avoid damaging bark, especially where ROD is present
-
Each trap should be installed 10-12 centimeters above the ground with a clear entrance
-
Traps should be recharged with CO2 and new bait every 30-180 days. This will vary based on location and accessibility. See Table 1 for more information.
Table 1: Summary table of lessons learned and limitations experienced by NRM programs across the state
A. Lessons Learned
1. A24 traps are more efficient in maintaining consistent control of rats than single-strike traps because they reduce the amount of labor needed to reset the traps.
2. Small grids with fewer than 5 traps are effective at reducing impacts to a small area (5 meters by 5 meters) with sensitive species. However, larger grids with more traps will reduce the frequency and intensity of impacts on protected resources over a larger area for a longer time.
3. Traps should be installed along access trails adjacent to sensitive areas to avoid direct impacts from trampling.
4. Areas with high rat density need to be serviced regularly to avoid rat damage to traps (Figure 1)
B. Limitations
1. Traps need to be recharged with bait and CO2 every 30-180 days.
2.At higher elevations (>7000’), the ALP inflates and pushes out the bait at a higher rate, emptying in just 30-60 days
3. ALP batches may not inflate (see Appendix 2)
4. The bait can clog in the bottle, stopping dispensing in dry climates. The bait can rot quickly and become moldy in wet climates. Birds, mollusks, ants, and other invertebrates will remove and consume the bait.
5. A24 in coastal areas may rust quickly, and rust-prevention treatments may repel rats
6. The warranty period (2 yrs) starts when the trap is deployed; however, warranty is voided if NOT using manufacturer CO2 canisters.
7. KFRPB has documented common malfunctions and how to track (see Appendix 3)

Figure 1. Trap showing severe rat damage due to gnawing of trap body. Areas with high rat density must be serviced on time. This grid was checked a year late and each trap looked like this. Traps that run out of strikes still have an attractive lure inside, that rats will try to get to when desperate enough.
Regulations and Worker Safety
Worker safety and personal protective equipment are recommended. Contact your supervisor for more information on applicable regulations and worker safety for your program.
-
Use nitrile gloves when handling traps and carcasses to limit exposure to blood-borne pathogens
-
Always keep fingers clear of the shroud entrance to avoid triggering trap
-
Only trigger the traps from the top (the lure bottle cradle side)
-
Always treat the trap as live until you have fully de-pressurized it
-
The CO2 canister will get cold enough to burn skin if it is quickly de-pressurized
-
After removing the CO2, trap still has 1 hit remaining, ensure it is fully emptied before transporting
The following links provide more information about State of Hawaiʻi and University of Hawaiʻi regulations. Contact your supervisor for more information on applicable regulations and worker safety.
Hawaii Department of Health: Rats and Mice
Hawaii Department of Health: Vector Control Branch | Rodent Program
Purchasing and Options
Goodnature A24 are available from the Automatic Trap Company (https://www.automatictrap.com/). The main body of the traps is standard, but there are a few options for how the bait is administered, different flavors and additives, and whether or not to use counters. Goodnature® manufactures a variety of bait flavors, such as Chocolate, Nut Butter, and Meat Lovers, and preference may vary by program and bait efficacy by location.
Implementation and Planning
1. Using GIS if possible, delineate the control area and note any public roads or trails, sensitive species location, and topographic limitations (steep slopes, riparian zones).
2. Using that map, determine the number of A24 traps needed to cover the control area. This is most efficiently completed by having transect 100m apart with traps every 50 meters on the transects.
Figure 2. Two methods of trap strategy. In the yellow box, a multi-transect landscape level grid where each trapline is spaced about 100m apart up the unit, with traps placed at about 50m intervals along each transect. In the pink box, smaller grids (<25m) form tight rings of protection around resources. Consider trap budget, resource needs, and maintenance logistics when choosing a strategy. (PC: ANRPO)

3. Determine if non-target exclusionary devices are needed to prevent injury to native birds. If ungulates are present in the control area, additional measures to prevent traps from being dislodged are required. These may include:
a. Attaching traps at least 2m from the ground (Figure 3a)
b. Using zip ties to secure traps to sturdy trees (Figure 3b, 1)
c. Kea Excluders (Figure 3b, 2)
d. Installing traps inside of wooden or wire mesh boxes
Figure 3a. Placing traps ~1.5m above ground reduces chances of low height disturbance (ungulate, mongoose, rockfall). Strategically choosing surrounding trees or manipulating fallen debris play a major part in the mount selection process.


Figure 3b. 1) Zipties securing trap to mount, used to mitigate ungulate interference. 2) Kea excluder altering the size of the trap opening.
Note counter attached to CO2 canister
4. Determining mounting location (Tree): Each trap should be installed 10-12 centimeters above the ground, on the up-slope side of a sturdy (> 3” diameter), straight (< 45 degrees), tree with a clear footing to allow animals to approach. Preferably, the tree should be non-native and not ʻōhiʻa where ROD is present.
Figure 4. One “shaka” length above the top layer of soil as close as possible to 45° is the recommended sweet spot to make the trap accessible and enticing.

5. Alternative installation–When working on lava flows, areas without trees, or in culturally sensitive areas, alternative mounting options include:
a. Goodnature A24 Portable Trap Stand Installation–the traps and stand must be secured on both sides with rocks or other heavy items to stabilize the trap and prevent tipping (Figure 5a)
b. Mounted to 2x2 stake with stake pounded into ground (Figure 5b)
c. Fence posts (Figure 5c)


Figure 5a. In areas where trees or sturdy mounts are unavailable, portable stands take the A24s capabilities anywhere.
Figure 5b. In areas where trees or sturdy mounts are unavailable, can opt to use a mounting stake, either purchased from the manufacturer or made in-house.
Figure 5c. Fence posts offer excellent mounts since they are usually at uniform distances from each other and do not grow like live trees.
6. Prepare new traps for installation by:
a. Remove the NZ penny from Automatic Lure Pumps (ALP) (Figure 6a, 6b)
b. If using counters, slide the soft rubber strap of the counter onto the CO2 canister. The button needs to face toward the operator, away from the shroud entrance and mounting apparatus, when it’s pushed into place (Figure 6c)


Figure 6a. Removing ALP penny before installing into trap.
Figure 6b. Removing ALP penny activates ALP circuit, which fully inflates in six months.
Figure 6c. Trap with counter installed. Note that white tab with count display is facing outward, away from trap opening. Counter pictured here from trap manufacturer.
7. Label and flag trap (Figure 7).

Figure 7. Ensure proper flagging and labelling is present at each trap. Pictured is a cattle tag placed at eye level with the trap directly below. Cattle tags and paint pens remain visible and legible for several years under a canopy.
Trap Checks
1. Always bring two extra A-24 units as well as CO2 and ALP (per person) when checking rat lines, be prepared to change out units that aren’t functioning.
2. Search for and locate carcasses near and downslope of the trap and dispose of them following project requirements. Leaving carcasses in place may attract predators (owls, cats, mongoose).
3. If a counter is present, press the button once to display the number of strikes and record data. To replace the counter, slide the soft rubber strap of the counter onto the CO2 canister. The button needs to face toward the operator, away from the stake when it’s pushed into place.
If the counter shows 15 or higher, the CO2 needs to be changed (Steps 9-12).
4. If no counter, but it has been > 4 months, the CO2 needs to be changed (Steps 9-12).
5. In some instances, the mounting bracket may become too tight because of tree growth–especially if mounted to Strawberry guava.
Address by:
a) Remove the trap from the mounting bracket and loosen the screws a couple of turns to prevent deforming the mounting bracket.
c) You may consider moving the trap to another tree if growth is interfering with the mount.
d) For trees that fall over, traps need to be relocated to a nearby, upright tree, or reoriented to follow the pathway of the trunk (Figure 8).

Figure 8. Trap oriented to follow the pathway of the trunk, with yellow line representing path along trunk into trap opening.
Make sure trap is mounted when testing trap or degassing. (See Figures 9 and 10).
6. Unscrew lid (Figure 9)

Figure 9. Trap with cap removed. Note locking mechanism between the trap itself and the tree.

Figure 10. Depress trigger FROM THE TOP. Use a stick or the opposite end of a used CO2 canister (as pictured here). During service, it is best to leave trap mounted when testing CO2 to allow energy to travel through the mount. There have been instances where handheld draining of CO2, has resulted in inner components striking itself.
7. Unscrew ALP (Record bait present Yes/No)
8. Check if the ALP did not inflate (see Data Management and Appendix 2 for more info)
9. Test the trigger– from the top of trap only (Figure 10) Record pass/fail
10. Drain CO2 from the trap and trigger until the trap is de-gassed and safe to handle. Never fire the trap in quick succession, as the CO2 in the canister expands, it gets extremely cold and this can damage the internal seals.
11. When needed, clean inside of trap, trigger, and bracket. Apply caution when choosing cleaning material as strong smelling chemicals, i.e., biodegradable wet wipes, may alter the smell profile of the trap. Consider using sticks or leaves to clean gunk from inside of trap.
12. Install new CO2. Note: you do not need to trigger the trap again
13. Install new ALP, make sure coin is removed and threads are correct (Figure 6a)
14. Remove excess bait released from mouth of ALP when penny is removed (Figure 6b). Excess bait can be smeared below the trap or removed from site.
15. Screw lid back on old ALP
16. If removed trap from mounting bracket–resecure the trap
17. If counter present: reset by depressing the button for ~5 seconds, count should read 0
18. Ensure flagging is maintained and trap number is visible (Figure 7)
Data Management
Table 4 shows minimum recommended data fields for tracking A24 use. You may also consider additional data to track trap malfunction and efficacy (see Appendix 3).
Recommendations and Tips
-
Consider using trap retention cables and/or locks if in high traffic areas.
-
Pre-baiting:
-
All traps should be installed and baited for several days at a minimum before they are set to kill.
-
It is also advisable to smear bait on the tree below each trap to encourage rats to investigate the trap.
-
The New Zealand Department of Conservation (DOC) recommends pre-baiting in order to attract rats to the traps, promote familiarity, and allow the rats to communicate information to other rats about their new food source (D. Peters, pers. comm.). In so doing, a rapid reduction, or “knockdown” of the rat population should occur once the traps are set because rats are accustomed to visiting the traps.
-
The traps may need to be serviced more frequently during the initial knockdown period to ensure that the bait is still present and fresh.
-
-
Never use a petroleum-based lubricants on any parts of the trap or canister
-
Known instances of regulator unscrewing, for assortment of reasons
-
Lubing connection between canister and trap may mitigate undiagnosed issues of this kind
-
If checking traps on a long return rate (6 mon+), or deploying traps in a highly corrosive environment, may consider applying a thin film of dry lube or silicone grease to the tip of the CO2 canister and threads
-
Additional Resources
Goodnature ALP Installation video: 50 second video on YouTube by product manufacturer demonstrating installation of ALP baits
Automatic Trap Company: US distributer of Goodnature Traps, find traps, accessories, documentation and video resources
Goodnature New Zealand: A24 manufacturer, explore their website to learn more about Goodnature Products.
A24 Success Guide: Goodnature's product guide for implementing A24 traps to control rats
New Zealand Department of Conservation: Predator control resource search
IACUC: UH's Institutional Animal Care and Use Committee ensures compliance with the Animal Welfare Act [9 CFR 2.31(c)(1)–8 and 2.31(d)(5,6,&7)] and the Public Health Service Policy IV.B.1-8
Next Steps
-
Research and development is needed to improve lures and other methods to attract rodents to traps. For example, scent only lures (ex: Arizonix – VM products).
-
Additional mounting methods need to be developed and tested for fences, in areas with no trees, etc.
-
How to deal with accumulation of plastic waste as individual traps are retired due to decreased efficacy.
-
Your need here! This section should reflect practitioners current needs. Let us know what they are!
Appendix 1: Field "Cheet Sheet"

Appendix 2: DNI Guide
DNI (Does Not Inflate) describes an ALP that has not inflated over the course of its lifetime. Since the pump hasn't supplied fresh bait, it can be concluded that the trap is not as attractive as it was manufactured to be. Whether bait is present or not is independent from ALP inflation. While uncommon, an ALP can be both DNI and have no bait inside of it.
The following guide assumes a grid is being checked at a four month interval. Longer maintenance intervals allow for ALPs to progress further into their inflation timeline which blurs which and when each ALP falls into the three categories.

Appendix 3: Common Trap Malfunctions
The following trap malfunctions have been identified through extensive data collection by the Kauaʻi Forest Bird Recovery Program (KFRBP).
The following data fields were defined by KFRBP in order to track the functioning of 1,000s of traps across their multiple grids in the Alakaʻi Plateau, Kauaʻi. They are shared here to support the implementation of this level of trap function monitoring.
General
Station ID – tap on field and search for station ID in the dropdown
Date and Time – autofill
Checked by – autofill based on user. Double check that this is accurate
Type of Check (multi-select)
Official (triennial) – big rat trip that happens in the spring, summer, and winter. Will be the default selection
Camera – if you are also doing a camera check/install on the trap. Can be selected in conjunction with the other options
Unofficial – rare trips to check/maintain traps
Arrival
Arrival Pictures – A side angle photo of trap that shows the entire trap and distance from ground. Additional photos of any carcasses/bones near trap.
Trap Arrival Status
Open – trap is open and armed, both bait container and CO2 container are present (though either may be empty)
Closed – Mounting bracket is present, but trap is missing (trap was removed on previous check and not replaced) OR trap is in an inactive position (on the ground, tree fell, etc) OR trap is present, but CO2/bait pouch are not present.
New (not present) – You are deploying a trap in a NEW location
Not Found – You cannot find the trap location
Arrival Counter Status
Working – counter is present and functional
Low Battery – counter present but with low battery warning
Broken – counter present, but not functional/turning on
Not Present – no counter on trap
NA – other misc. cases. e.g. : counter reads over 50+
Arrival Counter Number: if counter is present, record number. If not present, enter ‘999’
Arrival Trap On Tree
Trap on tree, with blocker – trap is set on tree with blocker attached correctly
Trap on tree, separated from blocker – trap is set on trap, but blocker is separated
Trap on tree with blocker, knocked from backplate but still attached – trap is still attached to trap thanks to zip ties, but is sitting sideways and no longer on the backplate. This is a common case at MOH when pigs hit the trap
Trap on ground, with blocker – trap has fallen from tree, but blocker still attached
Trap on ground, separated from blocker – trap on the ground and blocker is no longer attached
NA – trap is not present
Other – other misc. case
Arrival Bait Type
ALP Chocolate – foil lure. Will have red/orange/brown label ring
ALP Citric – foil lure. Will have white label ring that says slug repellent
ALP Unknown – foil lure. Choose this option if the label ring is not present
Static Chocolate – plastic tub lure
Static Citric – plastic tub slug repellent lure
Static Unknown – plastic tub – choose this option on arrival since the statics are difficult to distinguish
Other – see notes – other misc. baits
Arrival Bait Condition (multi-select)
ALP – Bait Remaining – a good amount of bait is still left in the ALP.
ALP – Bait Plug Only – the ALP has mostly air in it, there is only a small plug of bait left
ALP – Bait Completely Empty – the ALP is completely empty – you can see metal from inside the cap
ALP – Gas Not Full – ALP mostly deflated and not puffed up
ALP – Gas Full – ALP is full of gas
ALP – Coin On – coin still left on ALP
Static – Old – bait left in static lure
Static – Container Empty – completely empty lure container
Other (see notes) – other misc. cases
ALP Bait Serial Number – record the serial number of the ALP on the label tag (if present)
Arrival Test Fire
Pass – strong test fire right away. Good, functional trap.
Fail – trap does not fire at all or extremely weak, or you only hear CO2 hiss. Replace trap if this is the case, and you have plenty of replacements for the rest of the trip.
Weak Fire then Pass – first test fire is weak, and the following test fire is a pass. DO NOT replace traps in this case.
No Test – No trap present, or didn’t test fire
Captures
Arrival Total Bodies Found – total number of distinct bodies found AND fur in blocker. ID using skull or scapula or distinct separate clumps of fur/bones. This should be a sum of the next 6 fields. NOTE: The next 6 field are mutually exclusive.
Arrival Rattus spp – Total unknown rat spp found near trap. This will be used by most crews unless they are 100% confident of exact rat species IDs
Arrival Rattus rattus – Total Rattus rattus bodies found. Not used unless confident
Arrival Rattus exulans – Total Rattus exulans bodies found. Not used unless confident
Arrival Mus domesticus – Total mouse bodies found
Arrival Rodent spp/New Fur in Blocker – Total unknown rodent bodies, including new fur in blocker. Brand new fur that is clearly not from an old trip will go in this field. New fur may be sticking out of the blocker edges, not matted.
Arrival Old Fur in blocker – Enter 1 if there is old/matted fur in the blocker. This will count towards total captures, even though it is likely from a previous trip. If there is fur caked in the blocker and a body under the trap, this would be 2 total bodies found.
Maintenance
Trap Replaced
Installed – New trap installed at either a new station or a station without a trap
Replaced – Replaced old faulty trap with new one depending on test fire result. NOTE: If replacing a trap, use orange flagging on the old one and write the Station ID, date, and the problem with the trap. E.g. Test fire failed, Leaks CO2, cracked trap, etc. Also note the issue with the trap in the notes section.
Removed – Removed old trap and didn’t have a replacement
No – Old trap left in place
Arrival Trap ID (If Present) – Enter the Trap ID or Serial number and select it in the dropdown list if the trap is present at the station
Departure Trap ID (If Replaced/Installed) – If a new trap was installed/replaced, enter the trap id or serial number and select it in the dropdown list. Conditional based on the “Trap Replaced” field answer.
Maintenance Performed – Y/N. If Yes, then additional fields will appear below
Maintenance Type
Trap Lowered or Raised (See Maintenance Notes) – Trap moved on the same tree. Make a note in the notes section. Trap blocker MUST be touching the ground or be very close to the ground (1mm) to prevent Puiaohi from entering
Trap Moved to Another Location (See Maintenance Notes) – Moved trap to another location nearby to get it set better. Make a note in the notes section
Adjusted or Replaced Zip Ties – Zips adjusted or fixed
Adjusted Blocker – Fixed blocker to line up with trap
Adjusted/Replaced Screws – replaced or fixed old screws
Other (See Maintenance Notes) – other misc. maintenance
Maintenance Notes – explanatory notes for maintenance tasks
Departure
Departure Status
Open – trap is open and armed with CO2 and bait
Closed – trap is present, but not armed with CO2 and bait
Temporarily Removed – trap temporarily removed until we get a replacement
Permanently Removed – trap/station permanently removed
Departure Test Fire
Pass – strong test fire right away. Good, functional trap
Fail – trap does not fire at all or extremely weak, or you only hear CO2 hiss
No Test – No trap, or didn’t test fire
Departure CO2 Status
New – New CO2 installed
Old – Old CO2 left in place
None – No CO2. Not arming trap–make sure to mark trap as Closed or Removed
Departure Counter Status
Working – counter is present and functional
New – new counter added to trap
Low Battery – counter present but with low battery warning
Broken – counter present, but not functional/turning on
Not Present – no counter on trap
NA – other misc. cases. e.g. : counter reads over 50+
Departure Counter Number: if counter is present, ALWAYS leave on 1. This is the default. If no counter, then enter 999.
Departure Bait Type
ALP Chocolate – foil lure. Will have red/orange label ring
ALP Citric – foil lure. Will have white label ring that says slug repellent
ALP Unknown – foil lure. Choose this option if the label ring is not present
Static Chocolate – plastic tub lure
Static Citric –plastic tub slug repellent lure
Static Unknown – plastic tub – choose this option on arrival since the statics are difficult to distinguish
Other – see notes – other misc. baits
Departure Bait Condition (multi-select)
ALP – Fresh – Brand new ALP lure with coin off
ALP – Bait Remaining – a good amount of bait is still left in the ALP.
ALP – Bait Plug Only – the ALP has mostly air in it, only a small plug of bait left
ALP – Bait Completely Empty – the ALP is completely empty – you can see metal from inside the cap
ALP – Gas Not Full – ALP mostly deflated and not puffed up
ALP – Gas Full – ALP is full of gas
ALP – Coin On – coin still left on ALP
Static – Fresh – brand new static lure
Static – Old – bait left in static lure
Static – Container Empty – completely empty lure container
Other (see notes) – other misc. cases
Repair Needs at Station
No – Station is all set
Failed trap still at station – A trap with a failed or very weak fire is still at station, due to trap shortage, etc.
Needs counter – trap needs counter next trip
Needs blocker – Trap needs blocker next trip
Needs zips – Trap needs new zips next trip
Needs to be moved – needs screwdriver and needs to be moved to better spot
Needs trap – New trap needed at station
Screws stripped – Screws stripped and need replacements
Other – Other misc. needs. Add in notes
Carcass Fate
Removed – Cleared carcass away from trap leaving absolutely no bones behind. This will be done during Official trips.
Left in Place – Didn’t move carcass. This will be done on Unofficial trips.
Removed/Fur Still Present – Removed carcass, but fur is difficult to remove from trap/blocker.
NA – No carcass
Departure Photos – Photo of trap at a side angle, to show full trap and set on the tree.
Appendix 4: Grid Design
Ecosystem-level grids are most effective at reducing rat numbers across landscapes to ensure protection for rare and common species, compared to smaller trapping efforts. ANRPO has been designing and constructing grids for over ten years. Here are some general guidelines.
1. Sizing: The larger the better!
a. The greater the area protected, the smaller the edge effect and the larger the area protected within the grid
b. Limits to grid size include:
i. Budget for traps
ii. Manpower for deployment and servicing
iii. Terrain
iv. Access
2. Trap spacing: The New Zealand standard is 100x100 meters. However, in ANRPO’s experience, 100x50m is needed. ANRPO strongly suggests that programs begin at a higher trap density, monitor for effectiveness, and then, if possible, decrease trap density while ensuring that monitoring goals are met.
For example, ANRPO’s goal is to achieve 10% tracking, as measured by tracking tunnels. Our 100x50m grids mostly met this goal, but 100x100 does not. Thus, we have maintained a standard of 100x50m.
3. Trail system: All grids need good trails! ANRPO runs trails 100m apart and places devices at 50m intervals, facilitating 100x50m trap spacing. The way programs design these trails is often dictated by the terrain. ANRPO has done trails on contours, as well as running up and down ridges and gulches. There are pros and cons to both.
1. Contour Pros:
a. Trails are easier to walk as they are flat across areas.
b. Trails cross all terrain type evenly–gulches, ridges, and slopes
2. Up-Down Pros
a. Trails are much less prone to downslope erosion than contour trails
b. More tiring way to move across terrain
4. Grid examples: Below is a figure of the ʻĒkahanui Grid in Honouliuli Forest Reserve on Oʻahu.
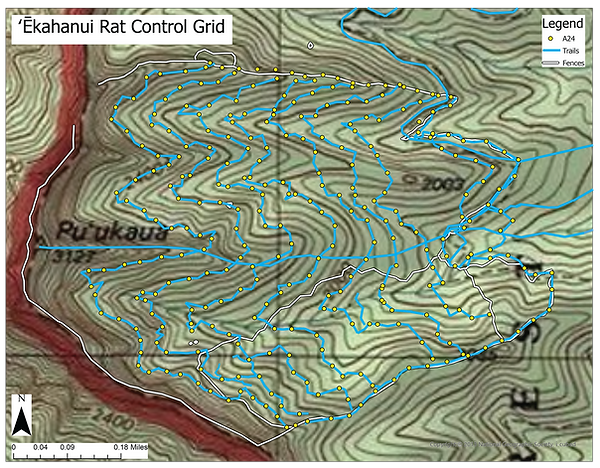
This shows a grid system across the steep gulches of ʻĒkahanui. The trails run on contours, spaced 100m apart in elevation, and A24s are deployed with 50m spacing along the trails. For the most part, the trails follow the contour and thus are less exhausting to traverse (compared to climbing up/down trails). However, there is significant upkeep needed, as erosion constantly affects the trails, causing soil and rock to come down. An even larger impact is the constant accumulation of trees, dead and alive, on the trails. In particular, Christmas Berry needs to be constantly cleared.
About this Resource
This document was developed in collaboration with natural resource management programs from across the state. The information was drawn from posters shared at the 2018 Predator Control Forum and programmatic SOPs (updates per program specific needs). This information was compiled and reviewed by Predator Control practitioners to indicate old information, provide updated information, and give insights on clarity. We worked together at the 2024 Hawaiʻi Conservation Conference as well as through the Hawaiʻi Conservation Alliance (HCA) with both the Effective Conservation Program subcommittee, and the HCA Steering Committee recruiting their staff to provide feedback. Around 8 programs contributed to the development of this RMP.
Matt Keir (DOFAW) developed the RMP template. Joby Rohrer, Jared Char and Aaron Pila (ANRPO) reviewed the included information and provided photos from their database. The Ecosystems Extension program facilitated the review, editing, and formatting of the document. Thanks to the Kauaʻi Forest Bird Recovery Program (KFRBP) for providing their summary of common trap malfunctions and an example data collection schema for monitoring trap efficacy.